Drawing eyes is one of the most crucial skills for any artist. Whether you’re a beginner or a seasoned pro, mastering the art of eye drawing can dramatically improve the realism and emotion of your artwork. In this ultimate guide, we’ll explore the best techniques, tips, and step-by-step instructions to help you create stunning, lifelike eyes.
Why Drawing Eyes is So Important in Art

Eyes are often referred to as the “windows to the soul.” They convey emotion, character, and depth, making them one of the most expressive parts of the human face. In portraiture and figure drawing, getting the eyes right can bring a drawing to life. Understanding the anatomy and structure of the eye is key to creating realistic eyes that draw viewers in.
Materials You’ll Need
Before you dive into drawing, it’s essential to have the right tools. Here’s a basic list of materials that will help you achieve the best results:
- Pencils: Use a range of pencils (2B, 4B, 6B) for different shading levels.
- Paper: Choose smooth, high-quality paper designed for detailed work.
- Eraser: A kneaded eraser is perfect for subtle highlights and corrections.
- Blending Stumps: For smooth shading and creating soft gradients.
- Sharpener: To keep your pencils in fine condition.
Step 1: Understanding Eye Anatomy
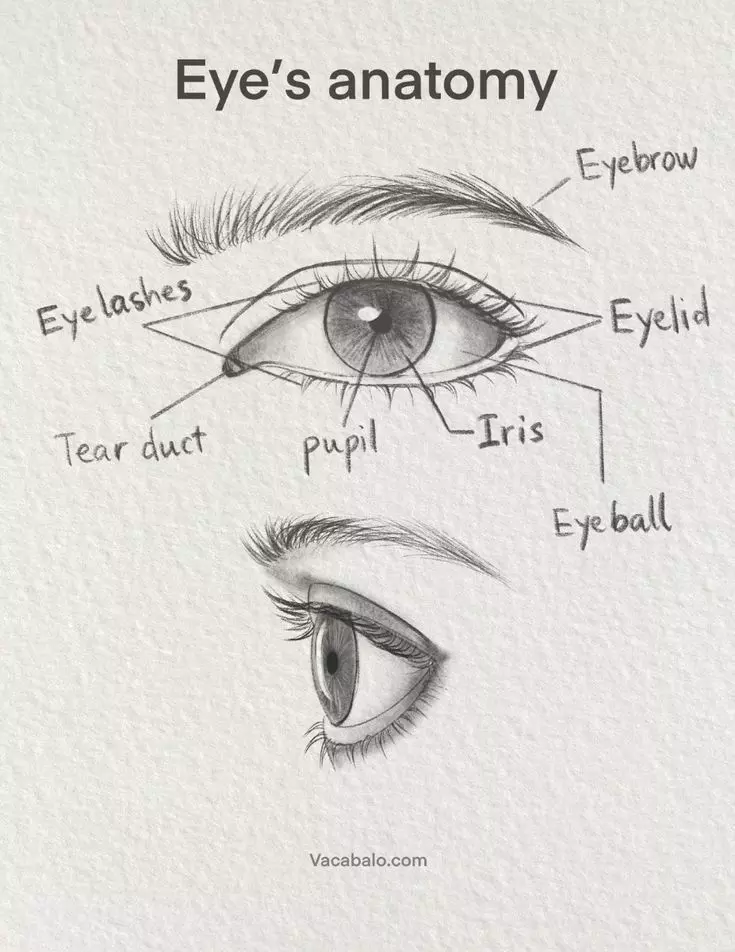
To draw a realistic eye, understanding its anatomy is essential. The human eye has many complex parts, but here are the basic components you need to know:
- The Sclera: The white part of the eye.
- The Iris: The colored part of the eye, which contains the pupil in the center.
- The Pupil: The black circle in the center of the iris, which changes size depending on light.
- The Eyelids: The upper and lower lids that cover the eye.
- The Tear Duct: The small area near the corner of the eye.
Taking the time to study these structures will help you create more accurate and expressive eyes.
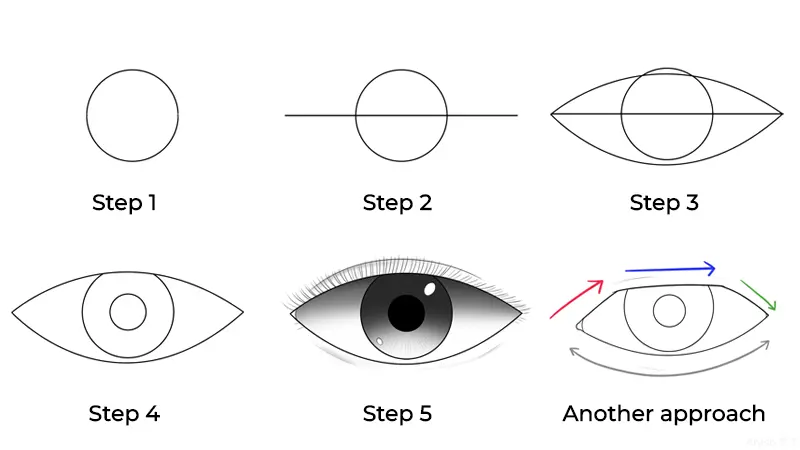
Step 2: Drawing the Basic Shape of the Eye
Start by lightly sketching the overall shape of the eye. While many think of the eye as being round, it’s actually more of an oval shape, slightly tapered at the edges. Here are the key steps:
- Outline the Shape: Lightly sketch an oval shape. You can use guidelines to help you get the proportions right. The top part of the eye is slightly curved, while the bottom tends to be more straight.
- Draw the Iris: Within the oval shape, draw a circle for the iris, making sure it is centered within the eye shape. The top of the iris is often partially hidden by the upper eyelid.
- Add the Pupil: Draw a smaller circle in the center of the iris. Make sure it is symmetrical and properly aligned.
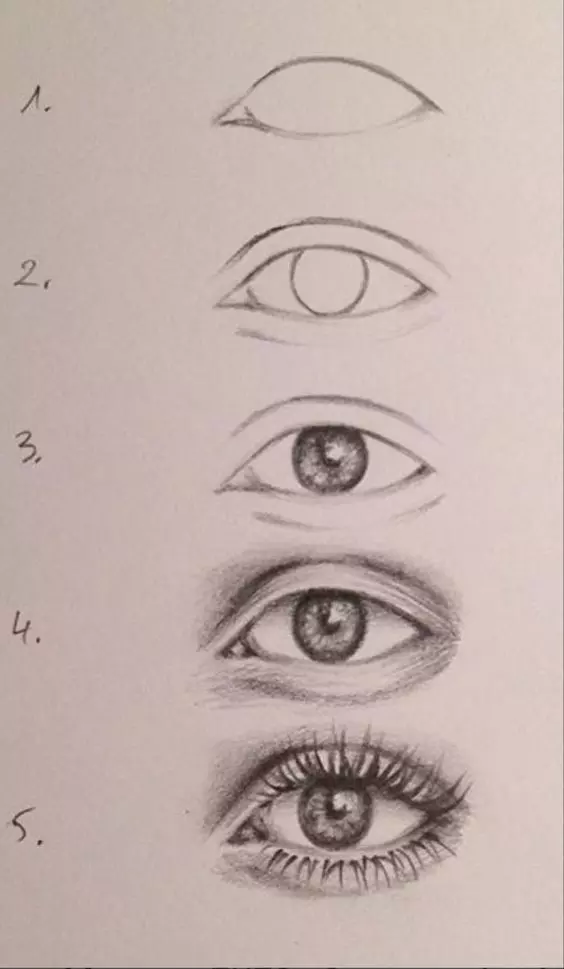
Step 3: Adding Details to the Eye
After you’ve sketched the basic outline of the eye, it’s time to add more details to make it come to life:
- Eyelids and Eyelashes: Draw the eyelids following the natural curvature of the eye. The upper lid typically has more weight and may cover part of the iris. Add eyelashes with delicate, curved strokes, focusing on the direction and volume.
- Shading the Sclera: The sclera, or white part of the eye, isn’t pure white. Use light shading to give it depth and form. Add soft shadows along the edges where the eyelids meet the sclera.
- Details in the Iris: The iris is one of the most important parts of the eye and requires a lot of attention to detail. Start by adding shading to the iris, working in layers. The outer edges of the iris are darker, while the center is lighter. You can use circular strokes to create texture and depth.
- Reflections: Eyes often have small reflections that add life to the drawing. Add highlights in the iris and pupil, especially near the top, to mimic light reflecting off the surface of the eye.
Step 4: Shading the Eye for Realism
Shading is crucial for achieving a realistic look. Follow these steps to properly shade the eye:
- Light Source: Determine where your light source is coming from. This will help you decide where to place the shadows and highlights.
- Use Layering: Begin shading with light strokes and gradually build up darker values. Focus on the areas that are naturally darker, such as the crease of the eyelid and the area under the lower lid.
- Blend the Shadows: Use a blending stump or your finger to soften harsh lines and blend the shadows. The smooth transition between light and dark areas will create a more realistic eye.
- Add Final Highlights: Use an eraser to gently lift out highlights from the sclera and iris. This will make the eye appear glossy and lifelike.
Step 5: Final Touches
After you’ve completed the shading, take a moment to step back and evaluate your work. Sometimes, it’s easy to get lost in the details, so it’s helpful to look at your drawing from a distance. Here are some final tips:
- Refine the Eyelashes: Use a sharp pencil to add delicate, fine details to the eyelashes.
- Adjust the Shadows: If any areas look too flat, add a little more shading to increase contrast.
- Fix Proportions: Ensure the proportions of the eye are correct by comparing different sections.
Common Mistakes to Avoid
- Too Much Detail Too Early: It’s easy to get caught up in the details of the iris or eyelashes, but start with light sketches and build up to finer details.
- Incorrect Proportions: Always keep an eye on the overall shape and proportions. Use guidelines to help with symmetry.
- Overblending: While blending is essential for smooth transitions, overblending can make the drawing look too soft and lack depth.
Practice Makes Perfect
The more you practice drawing eyes, the better you’ll become. Take time to observe real eyes, whether through reference photos or live subjects, and challenge yourself to replicate the intricate details you see. Over time, your eyes will evolve into more realistic, expressive works of art.
FAQs
How do I draw realistic eyes as a beginner?
Start with basic shapes, then add shading and details as you practice.
What pencils should I use for drawing eyes?
Use soft pencils like 2B, 4B, and 6B for shading and hard pencils for fine details.
How can I make the eye look more expressive?
Add highlights to the iris and pupil, and pay attention to the eyelids and lashes.
Do I need to shade the white part of the eye?
Yes, lightly shade the sclera to add depth and realism.
How can I practice drawing eyes better?
Draw regularly from reference images or real life to improve your skills.
Conclusion
Drawing realistic eyes takes practice and patience, but with the right techniques and an understanding of the anatomy, anyone can master this skill. Whether you’re aiming to create hyper-realistic portraits or simply want to improve your drawings, following the tips in this guide will help you achieve stunning results.

Alexander Smith is an accomplished blogger with years of experience in crafting engaging and insightful content. Known for his expertise and passion for storytelling, Alexander brings a unique perspective to Fascinate Names, captivating readers with his thoughtful analysis and fresh ideas. His extensive background in digital media and writing makes him a valuable voice in the blogging community.